always know where your towel is
Draw Part
Export to an STL or OBJ file.
While drawing, consider how the part will be printed.
Are there large overhangs requiring temporary supports?
What type of material will it use (PLA or PETG)?
This guide does not cover 3D drawing.
Slice Part
This process converts the STL or OBJ file to a Gcode file.
See below for more details about the decisions made while slicing.
Print Part
The Gcode can be sent to the printer via USB or an SD card.
An SD card is more convenient, but using USB allows more control.
Cover the print bed with blue painter's tape.
Make sure the bed is level.
Pre-heat the bed before starting the print.
Cura is a good program for slicing.
Current version is 3.04 (as of 2017-11-28).
There are an overwhelming amount of parameters to adjust.
Only a few need to be modified for most prints.
Follow these parameter guidelines to ensure a successful print.
Quality
For final products, use a Layer Height of 0.06mm - 0.15mm
The difference in quality between 0.06mm and 0.15mm is very small
Speed (Section 5)
Slower speeds greatly improve the quality of the print.
PLA: use a Print Speed between 50 - 120 mm/s.
80 mm/s is a good compromise.
Lower speeds are also necessary if there are many travel moves.
PETG: use a Print Speed between 40 - 60 mm/s.
byte x = 5 = 0b00000101
byte y = x & 0b00000011 = 0b00000001
Turning Bit On (|):
byte x = 5 = 0b00000101
byte x = x | 0b00000011 = 0b00000111
Direct Port Register Manipulation -Guide-
Timer Registers -Guide- | -Cheat Sheet-
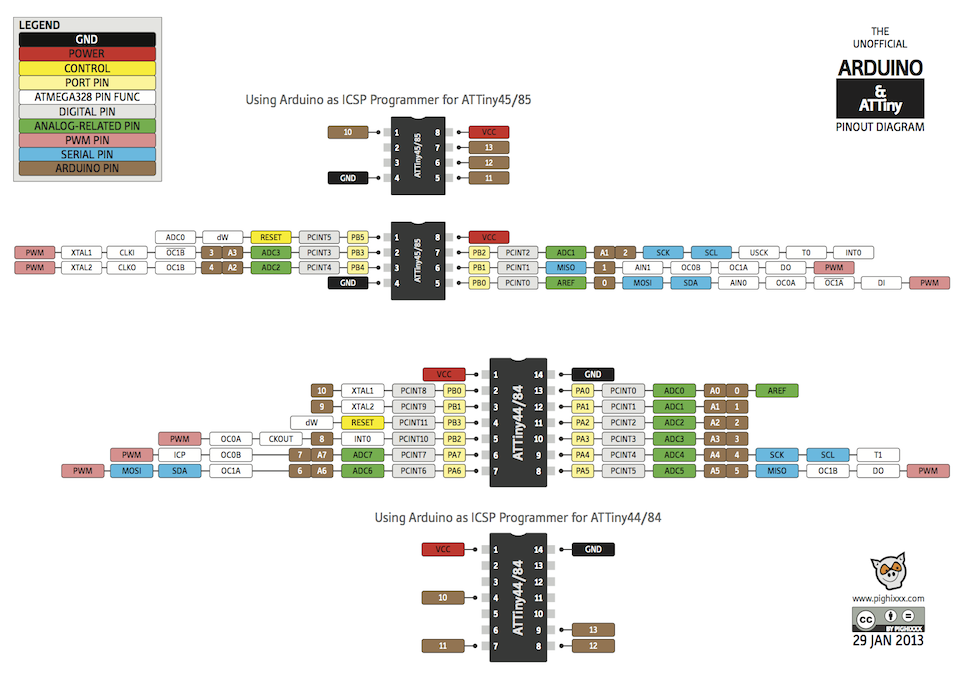
Pinouts -ATMega328- | -ATTiny85-
ATMega328:
| Timer | Size | Base frequency | Affected functions |
|---|---|---|---|
| 0 | 8-bit | 62500 | millis, micros, delay |
| 1 | 16-bit | 31372.55 | Servo library |
| 2 | 8-bit | 62500 | Tone |
ATTiny85:
| Timer | Size | Affected Functions |
|---|---|---|
| 0 |
Configuring Timers:
| Bit | 8 | 7 | 6 | 5 | 4 | 3 | 2 | 1 |
|---|---|---|---|---|---|---|---|---|
| TCCRxA | COM, 1A1, RW | COM, 1A0, RW | COM, 1B1, RW | COM, 1B0, RW | R | WG, M11, RW | WG, A10, RW | |
| TCCRxB | 1CNC 1 RW | 1CES, 1, RW | R | WG, M13, RW | WG, M12, RW | CS12, RW | CS11, RW | CS10, RW |
For PWM freq adjustment, set timer's base frequency divided by prescaler.
| CS12 | CS11 | CS10 | Prescaler |
|---|---|---|---|
| 0 | 0 | 0 | No Clock (default) |
| 0 | 0 | 1 | /1 (fastest) |
| 0 | 1 | 0 | /8 |
| 0 | 1 | 1 | /64 |
| 1 | 0 | 0 | /256 |
| 1 | 0 | 1 | /1024 (slowest) |
| 1 | 1 | 0 | Ext clock T1 pin - falling |
| 1 | 1 | 1 | Ext clock T1 pin - rising |
Initializing timers:
cli;
TCCRxA = 0;
TCCRxB = 0;
TIMSKx |= 1<
TCNT1 = startTime;
sei();
Board Manager URL's (separated by comma):
ATTiny: https://raw.githubusercontent.com/damellis/attiny/ide-1.6.x-boards-manager/package_damellis_attiny_index.json
ESP8266: http://arduino.esp8266.com/stable/package_esp8266com_index.json
Arduino as ISP --> ATMega328: homeautomation.org

Programming Bootloaded ATMega328 w/ FTDI: gammon.com.au
NOTES: Both Lilypad and Uno bootloaders are confirmed to work.
Adafruit FTDI cable has 5V supply and 3V logic - One or the other MUST be shifted.
Programmer: Select AVRISP mkII | Board: Lilypad Arduino or Arduino Uno
When changing from internal to external oscillator bootloader, don't forget to add the external oscillator.